
We can say that FlexboxLayout is an advanced LinearLayout. It can align it’s child views sequentially in both horizontal and vertical direction.
The main difference between LinearLayout and FlexboxLayout is that FlexboxLayout can wrap it’s child views.
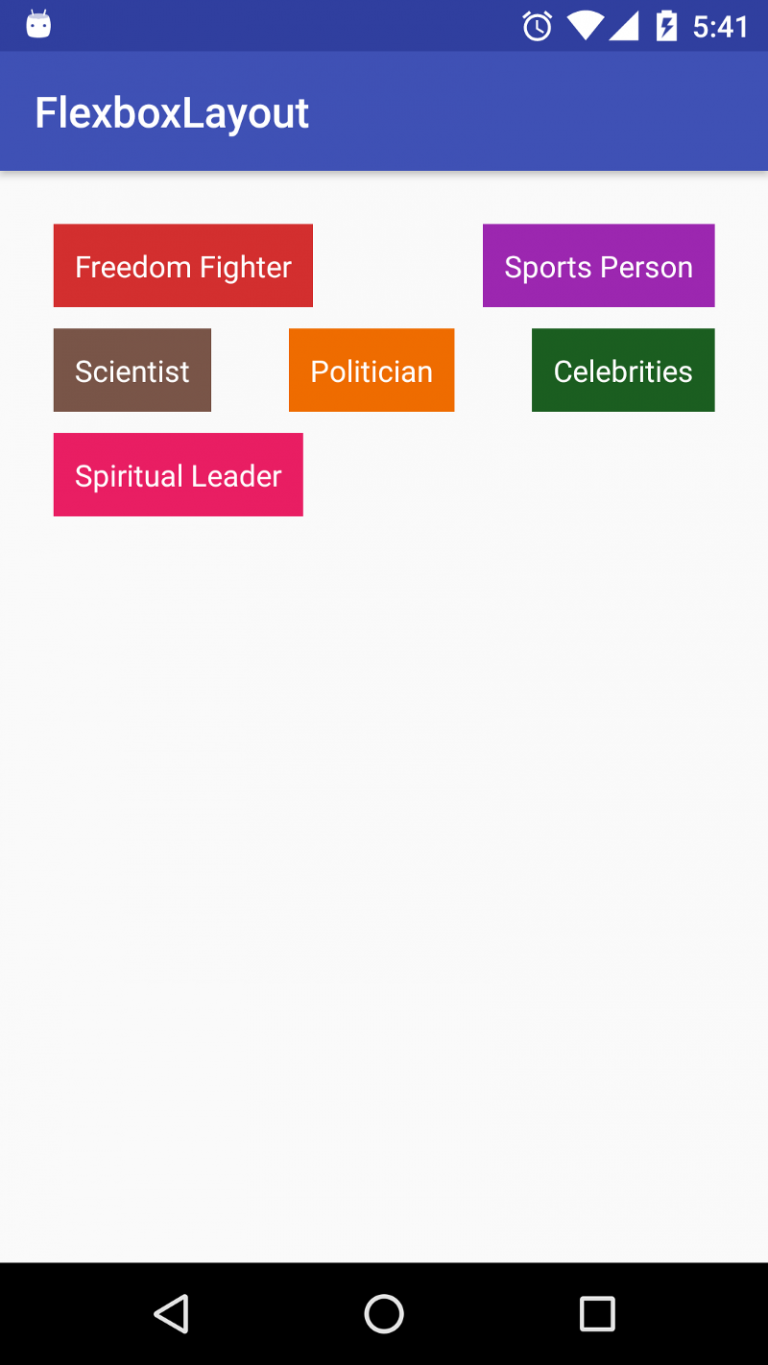
Let’s say if you want to build layout as shown in below image.
We can’t use LinearLayout as it places all the categories(child views) either in horizontal or vertical direction and child views will be clipped beyond
the layout bounds.
So here FlexboxLayout comes in to picture.
To use FlexboxLayout in your project first add a dependency to your module level build.gradle:
dependencies {
compile ‘com.google.android:flexbox:0.1.2’
}
activity_flexboxlayout.xml
<?xml version=”1.0″ encoding=”utf-8″?>
<com.google.android.flexbox.FlexboxLayout xmlns:android=”http://schemas.android.com/apk/res/android”
xmlns:app=”http://schemas.android.com/apk/res-auto”
android:layout_width=”match_parent”
android:layout_height=”wrap_content”
android:padding=”20dp”
app:flexDirection=”row”
app:flexWrap=”wrap”
app:justifyContent=”space_between”
app:layout_flexGrow=”1″><TextView
android:layout_width=”wrap_content”
android:layout_height=”wrap_content”
android:layout_margin=”5dp”
android:background=”#D32F2F”
android:padding=”10dp”
android:text=”@string/freedom_fighters”
android:textColor=”#ffffff”></TextView><TextView
android:layout_width=”wrap_content”
android:layout_height=”wrap_content”
android:layout_margin=”5dp”
android:background=”#9C27B0″
android:padding=”10dp”
android:text=”@string/sports_person”
android:textColor=”#ffffff”></TextView><TextView
android:layout_width=”wrap_content”
android:layout_height=”wrap_content”
android:layout_margin=”5dp”
android:background=”#795548″
android:padding=”10dp”
android:text=”@string/scientist”
android:textColor=”#ffffff”></TextView><TextView
android:layout_width=”wrap_content”
android:layout_height=”wrap_content”
android:layout_margin=”5dp”
android:background=”#EF6C00″
android:padding=”10dp”
android:text=”@string/politician”
android:textColor=”#ffffff”></TextView><TextView
android:layout_width=”wrap_content”
android:layout_height=”wrap_content”
android:layout_margin=”5dp”
android:background=”#1B5E20″
android:padding=”10dp”
android:text=”@string/celebrities”
android:textColor=”#ffffff”></TextView><TextView
android:layout_width=”wrap_content”
android:layout_height=”wrap_content”
android:layout_margin=”5dp”
android:background=”#E91E63″
android:padding=”10dp”
android:text=”@string/spiritual_leaders”
android:textColor=”#ffffff”></TextView></com.google.android.flexbox.FlexboxLayout
You can see that we used attributes flexWrap,flexDirection,justifyContent and layout_flexGrow in our code.
Let’s understand it.
‘flexWrap’ has 3 values(wrap,nowrap and wrap_reverse).You can see the result for wrap as shown in above picture.
‘nowrap’ will place all the views in single row/column (as per flexDirection value).
‘wrap_reverse’ will change the order of ‘row’ or ‘column’(as per flexDirection value)
‘flexDirection’ has 4 values(row,column,row_reverse and column_reverse).
All 4 values are self explanatory.
‘layout_flexGrow’ is set to 1 so free space will be evenly distributed to each of them.
‘justifyContent’ has 5 values(flex_start,flex_end,center,space_around,space_between).
flex_start,flex_end and center decides the position child views. If we use center then child views will be in center(depending on flexDirection) of the FlexboxLayout.
space_around and space_between are used to manage spaces between/around child views.